
Our Website

Our website
Our Digipak Cover

Our Digipak Cover
Showing posts with label A2 CONSTRUCTION. Show all posts
Showing posts with label A2 CONSTRUCTION. Show all posts
Sunday, 7 December 2014
Post- Production: Audience Survey
In order to get a sense of what to improve in our edit, after completing the first graded draft, as well as teacher feedback, we got our peers to review our video and then give us feedback- the video can be viewed below:
Although it was generally positive, this enabled to change certain aspects of the video- such as cutting down on VHS footage in order to focus more on the artists themselves, and also cut between the narrative and VHS more regularly to improve the visual appeal.
The Edit
Editing
Once we had completed capturing all of our required footage, we took to our edit suite in order to review the videos as a whole and select the individual takes necessary to complete our project, and discard those which did not make the cut.
After labeling and renaming all of the takes we wanted to use in the edit, Josh cleverly laid out all of the studio shots onto the timeline and syncronised them all with actual track. This proved to be a real time savig move, as now, when selecting between shots, we no longer hasd to carefully syncronise it when adding it to the timeline.
 |
| This shows all of the shots in sync with the music |
However, although this was initially beneficial, as some of the takes did not include the whole song, or skipped parts, we had to pick out each shot, using the razor to individually crop out the faults in each.
Once we had cropped down each shot to the part of the song we needed for it, we were able to construct a basic video timeline- as shown in the screenshot below. Although this did not yet contain any of the narrative footage, it gave us an ideas as to what the video shall look like, and we saw that all of the narrative shots would make continual progress as planned.
 |
| The initial studio timeline |
 |
| Alternative tracks used for editing |
The screenshot above shows how we used the alternating channel/track editing style in order to avoid muddling shots and making it easier to move them around on the timeline. We also created multiple sequences during the different stages of production, all on the same file, in this sense we could switch back to our old sequence to see how to edit each shot.
| The various sequences in the premiere pro file |
Another problem which we solved through editing was the timing of some of the shots with the beat. We had planned to use blinking shots of the two artists to match up with the beat, but when imported, they didnt match up, or were disrupted by movement on set. In order to combat this, we slowed down specific parts of the shot to make sure that the blink snapped in time with the beat:
 |
| We slowed down certain shots to ensure that they snapped to the beat |
We also retained the style of a music video defined by Carol Vernallis- firstly, we had already ensured that the video reflected the lyrics of the song in the shoots, but by editing the clips down, we were able to emphasis this relationship. Furthermore, our editing meant that the video now snapped to the beat, and contained a variety of angled shots in succession, another of Vernallis's conventions. By switching between black and white shots throughout, we also challenged audience expectations, as it is not obvious when the black will switch to white, making the visual aspect constantly unpredictable and entertaining for the viewer. Below is a video showing our use of Vernallis's ideas:
We also challenged audience expectations in the video- both defying the 30 degree rule, using non-continuous editing, and an alternating editing pace in order to engage the audience. This is shown in the gifs below:


Grading
 |
| An ungraded studio shot |
We started off grading once we had completed the video sequence, starting off by reviewing the video and making a note of which shots were obviously different in terms of colour and lighting. we focused on fixing these shots first, using the procamp and 3 way colour corrector feautures to improve the image colour and sharpness.
We used the 3 way colour corrector to firstly edit the colouring of shots to balance them out with the rest. Using the shot of vivian below as an example, we first noticed that the lighting here was extremely low and dull, therefore it needed to be clarified and intensified by adding colour to her face and body. By adjusting the hue balance and angle colouring, we were able to recreate the intense High definition hyperreal representation of the artists we had achieved throughout.
 |
| Left: Ungraded, right: graded |
 | ||
| A split screen showing the ungraded and graded shots |

We then used the procamp tool improve the whole sequence slightly, indivdually applying it shot by shot to bring up the professinal look of the video, and ensure that the representation of the artists was as clear as possible.
By using the procamp tool, we could pick out specific elements of each shot such as their brightness, contrast, hue and saturation in order to either brighten or intensify the shot. The screenshot below shows an example of a mid shot of Josh, which was initially quite dark, we altered the contrast and saturation, with the resulting shot much clearer and more professional:
 |
| Using procamp to improve clarity |
 |
| Fully graded final shot |
We also used the more complex editing software Adobe after effects on certain VHS shots in order to to improve their clarity and help us make the lighting appear similar and realistic throughout the narrative sequence, so that it is clear that the same camera is being used.
Overall, I feel that the edit this year has been a lot more successful than my year 12 and Prelim edits, as I have been able to apply my developed editing skills, along with the rest of my group, making the final product seem a lot more professional- the standard is definitely higher. However, I also found it a lot harder, as there were so many variations of shots to syncronise and edit, yet as I have learned over the past month how to use after effects to individually edit a shot, I still feel have gained a lot from the process.
Sunday, 30 November 2014
Production Overview and Group Dynamics
Overall, in reflection of the past month, I feel that as a group, we have been very effective in organising and carry out the production stage, and as a result we have experienced only a few minor setbacks and issues.
Through planning the shootboard, shot list, and animatic well in advance, we had a clear understanding of exactly what we wanted to achieve shot-wise within the studio, and as a result, we were able to work accordingly with our allocated time slots both in the sudio and also on our location shoots.
Furthermore, by attending bi-weekly group planning meetings, we ensured that we were fulfilling the indivdual tasks we set one another to speed up the production process, and make sure that we were putting n an equal level of effort.
For example, we were able to ascertain in advance as to what props, lighting abnd costume would be necessary for the shoot, so that we could use all of these in our rehearsals to test whether they would achieve the look we wanted in the real shoots.
Also, alongside the actual shoot, we assigned one another roles in producing the album cover, website and promotional shots- assigning them in accordance of our individual strengths (e.g. photoshop skills) , in order to ensure that the final products were as professional and effective as possible.
Studio Session 5 - Footage Review
After our final shoot, we reviewed the footage; which was predominantly promotional shots in the different outfits and with different props, as well as a couple of reshoots.


We realised that we were now completely ready for the edit- with multiple good takes for each shot, as well as a variety of many new promo shots. However, on closer inspection, we noticed that due to an unintended change in lighting in the studio, some of the new promo shots were not as clear as ones previously shot.

However this was not a problem, as the video footage we shot was not affected, and we also managed to get a variety of new styles of promotional shots-for example using headphones as props to replicate a professional studio setting.

We realised that we were now completely ready for the edit- with multiple good takes for each shot, as well as a variety of many new promo shots. However, on closer inspection, we noticed that due to an unintended change in lighting in the studio, some of the new promo shots were not as clear as ones previously shot.
However this was not a problem, as the video footage we shot was not affected, and we also managed to get a variety of new styles of promotional shots-for example using headphones as props to replicate a professional studio setting.
Saturday, 22 November 2014
VHS Final Review
Our third location was shot once again in Central London, however, this time we shot during the evening to give the feel of a romantic evening stroll alongside the river Thames- with iconic locations such as the shard and Tower Bridge in the background. Overall, these shots were successfully achieved, in the sense that we are now able to clearly reflect the artists British image, with the locations clearly obvious throughout the shots.
However, one problem that we encountered was a lack of lighting at the locations- we already knew that the camera was not great at picking up light, however, were surprised at the lack of street lighting in such a busy area. Despite this, we shot at various angles to try to avoid any lack of clarity, and when watching the shots back it is clear that the characters are starting to lose the initial connection they had- reflected through the focus on their facial expressions.
After completing the initial breakdown shots, we then planned and executed our final location shoot at a friends house- representing the female's home, in order to present the end of the relationship. In order to make it clear that I was breaking up with Gina, we focused on her angry expressions and reaction, rather than my emotionless face, We also used a shot of Gina throwing the clothes which I wore throughout the other shoot days at me, hing to achieve the feeling that she is throwing me out of her home in anger.
We encountered issues with shooting in the small space of the home, meaning that it was necessary to shoot handheld in order to successfully track the action of the break up. In reflection, some of the shots were too shaky to use, and others felt too forced- we decided to keep the scene to a minimum to avoid slowing down the narrative. The acting was satisfyingly believable when we played it back in succession, however, we felt that it lacked a clear ending.
In order to create a more dramatic ending, we decided to shoot me slamming the door of Gina's 'house', however, as this was an exterior location, we used a friend's front door closer to school to recreate the scene. These new shots fitted in with the old ones, however, due to shooting at a different time of day, and accidentally selecting a higher exposure camera mode, the lighting was different. We saw this as a minor issue though, as it was clear from the narrative that it was because I had left the interior location of the home, and can easily be fixed during the grading process.
Friday, 21 November 2014
Real VHS footage/ After effects comparison
After our first location shoot, using my camera to film the 'party' scene for the music video, we experienced a couple of minor technical difficulties with the camera- its old age meant a short battery life and also its ability to pick up shots in low lighting. As a result, we decided that in order to ensure the protection of the location footage we capture on each shoot, we should also film on a standard HD camcorder provided by the school, editing this in order to continue the VHS style.
We used online video tutorials such as the ones below in order to teach ourselves how to edit HD footage to make it appear old and more stylised.
We then took some of our location footage from the second shoot and practiced the editing styles from the video tutorial above in the hope that we could achieve realistic results, however, when comparing the real footage and the after effects footage, the editing seemed unconvincing and amateurish, so we decided to take the approach of the video shown below, following the text instructions:
Despite finding the second tutorial a lot harder, as it did not involve importing someone Else's presets, we managed to trial different levels of grain and lighting until we noticed the VHS style was achieved. After comparing the effects we had created using after effects with the original VHS footage, we were pleasantly surprised- the video below shows a comparison of the fake and real VHS footage: (0:04-0.09 the real VHS footage).
However, after developing from this basic comparison and importing both styles of footage into the video timeline, we decided that the fake VHS effect was not as interesting to view, therefore decided it should only be used as a back up. When using the VHS footage on the timeline, we also like the black lines and scratched tape effects that the VHS footage produced- reflecting the authentic 'archive' feel.
Theory: Carol Vernallis
When producing our music video, we also took inspiration form Media theorist Carol Vernallis, who highlighted the clear differences between a film and a music video, breaking down the video into four concepts: Narrative, editing, framing, and camera movement to do so.
Narrative:
Vernallis argues that what is happening in the video reflects the song, therefore it is the visual representation of the lyrics. We have attempted to employ this through both story lines in our video- firstly presenting the distanced relationship and how they come back together- walking towards one another, and also through our secondary narrative- with the break-up of the couple highlighting the dark tone of the song about love.
Editing
Carol says that unlike normal films, music videos break the rule of continuity- as they are normally only 2 to 4 minutes long, they need to be rapid and eye catching to engage the audience and reflect the entire message of the song and its style- it "cuts to the beat". Within our video, we aim to apply this theory by matching the beat of the song to our editing, to reflect its style, whilst also using a "rapid shift" between scenes to break the continuity rule and draw the attention between the individual artists and the narrative story.
Camera Movement
Vernallis argued that in a music video, the camera should move in time with the music in order to create a better sense of rhythm- "producing the illusion of an edit although there has not been one". Within our video we use very little camera movement, but the variety of angles and unusual tilts is intentional to reflect her views.
Framing
One of Vernallis's ideas is that by breaking the fourth wall, we no longer view the artists as objects but more as real individuals- the most common framing being the artist in the centre of the frame, as well as master shots to introduce the setting and imagery of the song. We definitely have tried to stick to this framing in our video- with the majority of our studio footage directly focusing on the artist, both individually and together, to give the video structure and promote the artist and avoid focusing on the sub-narrative.
Narrative:
Vernallis argues that what is happening in the video reflects the song, therefore it is the visual representation of the lyrics. We have attempted to employ this through both story lines in our video- firstly presenting the distanced relationship and how they come back together- walking towards one another, and also through our secondary narrative- with the break-up of the couple highlighting the dark tone of the song about love.
Editing
 |
| Our Vernallis Inspired video timeline |
Camera Movement
Vernallis argued that in a music video, the camera should move in time with the music in order to create a better sense of rhythm- "producing the illusion of an edit although there has not been one". Within our video we use very little camera movement, but the variety of angles and unusual tilts is intentional to reflect her views.
Framing
One of Vernallis's ideas is that by breaking the fourth wall, we no longer view the artists as objects but more as real individuals- the most common framing being the artist in the centre of the frame, as well as master shots to introduce the setting and imagery of the song. We definitely have tried to stick to this framing in our video- with the majority of our studio footage directly focusing on the artist, both individually and together, to give the video structure and promote the artist and avoid focusing on the sub-narrative.
Studio Session 4 - Footage Review
By this shoot, we had become really familiar with the lighting and control desk, this is visible in the shots, as on screen, it is clear that the lighting is well focused on the subjects, differing between shot angles, and group shots.
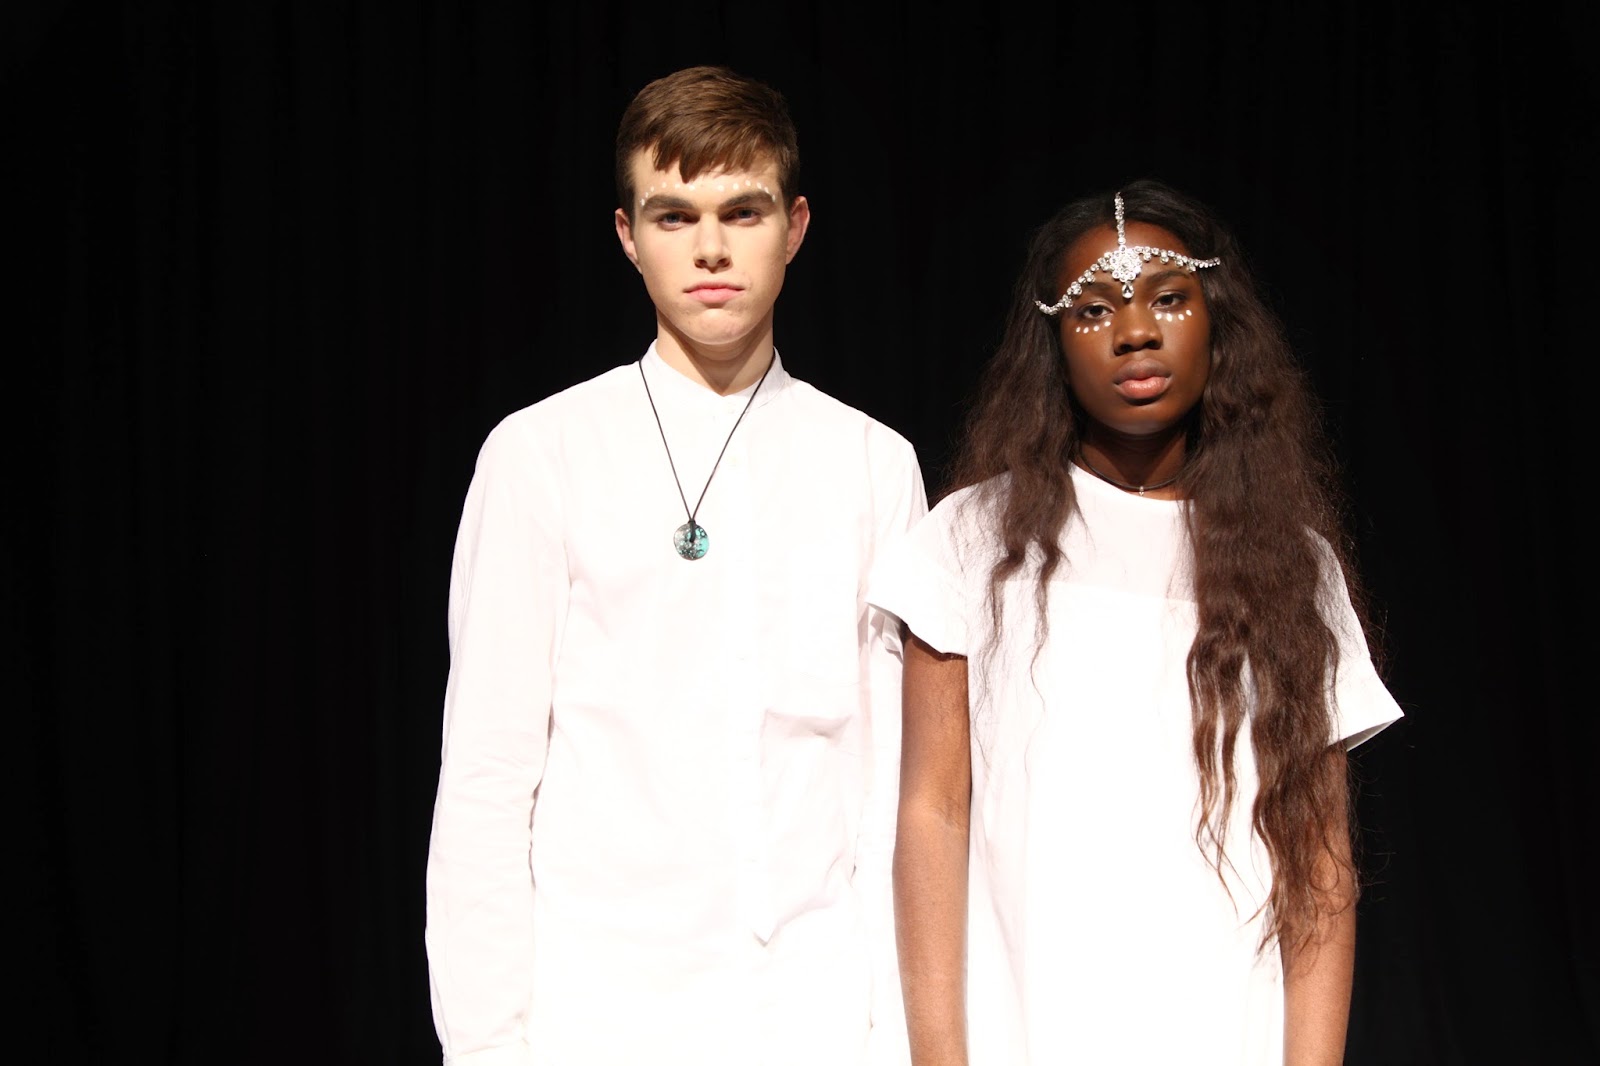
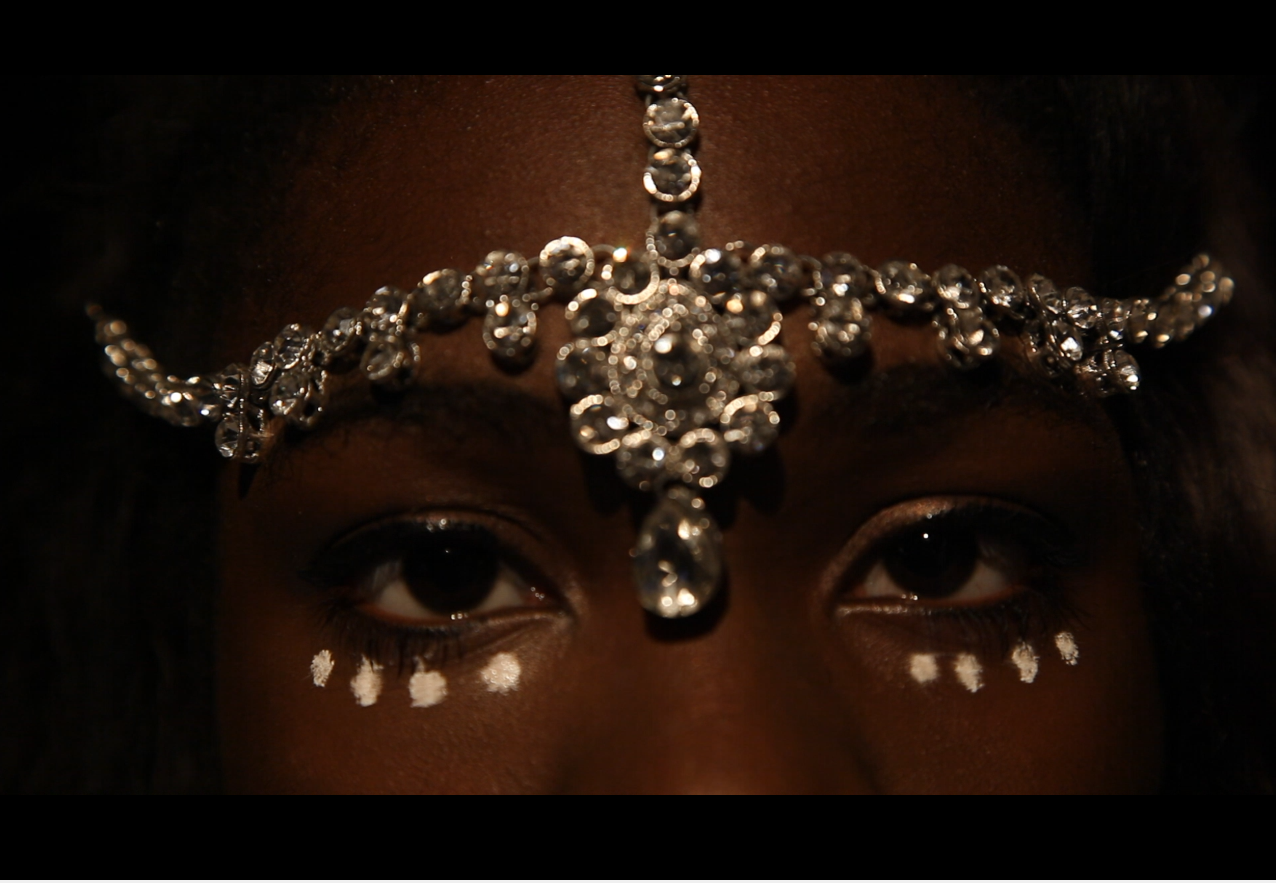
We also realised when viewing the shots on screen, the focus on the extreme close ups was much more clear, improving the look of the entire video, and revealing the minute detail of the artists facial paints and Vivian's Headdress.

Better lighting and focus

More attention to detail e.g. hand, necklace and tribal dots

Clearer, stronger shots of the artists together

Altogether, in review, we can confirm that we now have all shots needed for the video, however, there are minor slips in a couple of shots, but we still have another shoot day, therefore plenty of time for pickups, any remaining studio time we have at the end of the last session shall be used for promo shots, using slow shutter and lighting.
Studio Session 3- Footage Review
We are really happy with the shots from todays shoot, we focused mainly on the black shots, and although they looked good on camera, we faced a problem due to the fact that the floor is not black so we cannot replicate the long shots on white. We have decided we will make up for this by including more obscure angles on black, only filming above the waist and close ups, to avoid revealing the floor.


We also noticed that due to the black background, the shots were not as clear or bright as when shooting on white, although this was not a major problem, as it could be rectified during grading, we shall ensure this doesn't happen again by increasing the intensity and focusing the beams on the individuals during black shots.
Yet we were able to see the new accessories on screen for the first time, and were impressed by the strong visual effect they had- they worked well with the plain black background to present the alternative artist image.

Studio Session 2 - Footage Review
After this shoot, we had completed a large section of the studio footage, so were able to create a more complete first draft of the edit- shown below:
In review of the edit, we were very happy with the overall look of the video, and the transition from actual studio footage to the VHS narrative, as it clearly made sense as to who the artist was.However, we noticed some things that we must change- the first being that we had turned up the intensity of lighting too high on the studio shots- bleaching out Josh too much. We realised that next time we must lower it for those shots.
In review of the edit, we were very happy with the overall look of the video, and the transition from actual studio footage to the VHS narrative, as it clearly made sense as to who the artist was.However, we noticed some things that we must change- the first being that we had turned up the intensity of lighting too high on the studio shots- bleaching out Josh too much. We realised that next time we must lower it for those shots.
 |
| Too much light on Josh |
Studio Session 1 - Footage Review
After importing the footage from our first shoot, (test shoot), we were able to put some of it onto a timeline with the VHS footage previously captured in order to see what the two types of footage looked like in transition, snapping to the beat as we planned.
The video can be seen here:
As we only had the long shot in the studio to use, there is not much to see, and it is clear that in order for the style to work, there must be a variety of camera angles and more frequent cuts between narrative and studio shots in order to keep the audience entertained. We will bare this in mind on our next shoot and create a new shoot board with more variations.
Altogether, the footage has given me confidence in our plans, and I feel that with more time and concentration on specific shots, the style will work well. Also. we feel that the transition to VHS is not as bad as we expected= with the change in video dimensions and the black bars creating a clear representation of the camera/ time change.
Studio session 5 - 28th November
As we had finished the majority of our studio shots, we used our final half-day shoot to reshoot the few shots which we had marked out in review of all of our other shoots beforehand. As we knew and had planned which shpts to reshoot, this part of the shoot was carried out quickly and efficiently but to the same professional standard. After finishing the video footage, we made the most of our remaining time to reshoot some of our promotional shots with the recent adaptations and additions to costumes and props, and still managed to finish ahead of schedule- the shoot lasted less than 2 hours in total, and after double checking our footage, we were all very relieved and satisfied.
 |
| Using the monitor to immediately review the promo shots |
 |
| Seb taking control of the black-on-white promo shots |
Studio Session 4- 21st November
Our fourth studio filming session was the longest of all five, and we planned well in advance, as we knew that this would be our main opportunity to capture all of the footage necessary for our final product. As we had until 9pm to shoot, we were able to all come together as a group- uninterrupted by lessons, which meant that production was at a consistently high standard.

With all of our costume, makeup and props, we were able to focus on every aesthetic detail to create the intense, high quality video we had aimed to achieve from the start.

By planning and creating a specific shoot board and shot ist beforehand, we were able to ensure that we spent more time on the more complex shots, completing them earlier in the day to ensure that we didn't run out of time.

After each take, we played back the footage to try and point out any flaws, shooting three takes for every shot just incase.
After ensuring that all shots had been completed, we used the rest of our studio time to shoot the promo shots of our artist for the website and album cover insides.


Overall, this shoot was arguably our most effective, and it was clear that we had learned from our previous shoot experiences and hiccups, and we are confident that our footage will reflect this.
Studio Session 3 - 20th November
After reviewing the footage from shoot 2 on the 13th November, which was our first proper shoot, we realised that ou studio footage was extremely static and npt too appealing to the eye. As a result, in this shoot, we tried out various new techniques in order to make the footage more interesting and appealing.
One of our main ideas was to have 2 contrasting sets- one black backdrp with white costumes, ad the other a whiteout with black costumes, and hoped that the contrast between the two would create an affect similar to the use of colour contrasting in Hot Chip's 'Ready for the floor' music video.


When reviewing our footage during the shoot, we were pleasantly surprised by the effect the contrast between black and white setup created, however, we were looking forwad o taking the footage to the edit suite to compare the two setups alongside one another.


Studio Session 2 - 13th November
Our shoot on the 13th of November was our first proper shoot- however, as it was during the school day we wouldn't all be in the studio at the same times throughout the day, therefore we planned our day beforehand, using a shoot board to ensure we spent equal time on each shot to complete the entire sequence by the end of the shoot.


As I had free periods before the rest of the group, I went to the studio early with Chris the media technician to set up the set, camera and adjust the lights to our presets, as well as moving the spots into their correct positions.

Once this was finished, the rest of the team arrived, and after a good while doing Josh and Vivian's makeup and hair, we were finally able to shoot the video. After a while we realised that we had overestimated how long each shot would take, and as a result at the end of shooting video we had plenty of time left over to experiment with more alternative shots we had not thought of previously. We then were able to develop upon and shoot some of our studio based promo shots.
The shoot was a great success for us as a group, and our teamwork had payed off, enabling us to take many promo shots on top of the high quality footage we had filmed- meaning that we could make progress both on the video, as we had all the shots necessary to create the basic studio section, and also many photos which we could use to develop a template for our website and album cover.


Subscribe to:
Posts (Atom)